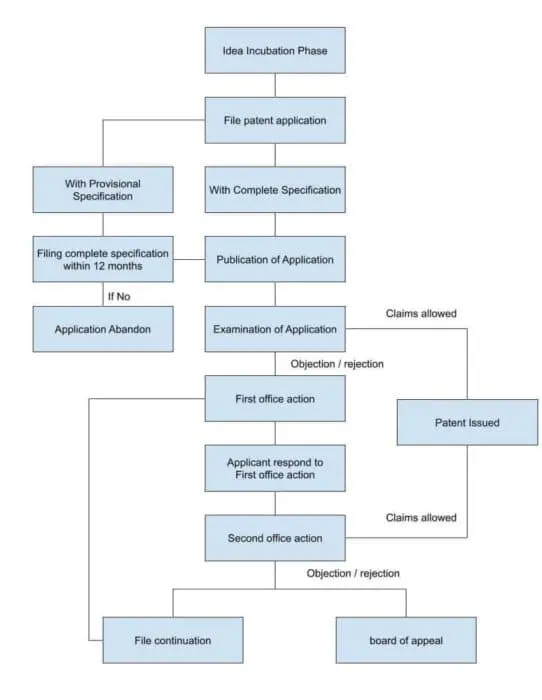
Complete Steps and a flow chart from Idea to granted patent
Stage-wise procedure and Cost for getting patent in US
- Step 1: Idea to Invention Disclosure (inception of the invention)
- Step 2: Patentability search or novelty search (optional step)
- Step 3: Patent drafting/writing
- Step 4: Filing a patent application
- Step 5: Publication of patent application
- Step 6: Examination of patent application
- Step 7: Office action- Response to objections
- Step 8: Grant of patent / Notice of Allowance
- Going from idea to complete invention disclosure: Every invention has its beginning in an Idea. In this phase, you capture your idea properly, get clarity on each element of the innovative idea, and fill in the blank spots with appropriate research and experiment. The inventor creates and documents their invention, including its functionality and unique features.
- Patent Search: (optional step) Conduct a thorough search to determine if a similar invention has already been patented or disclosed publicly. This step helps assess the novelty and potential patentability of the invention.
- Drafting a Patent Application: Prepare a detailed and accurate patent application, including a written description, claims, and any necessary drawings or diagrams. It is recommended to seek professional assistance from a patent attorney or agent during this stage.
- Filing the Application: Submit the patent application to the United States Patent and Trademark Office (USPTO). Pay the required fees to initiate the review process.
- Patent Application Review / examination : The USPTO assigns an examiner who reviews the patent application to determine its compliance with legal requirements and assess the invention’s novelty and non-obviousness. The examiner may request additional information or make objections or rejections.
- Office Action: If the examiner raises objections or rejections, the applicant must respond with arguments, clarifications, or amendments to overcome the objections. This back-and-forth correspondence between the applicant and the examiner is known as the “prosecution” of the patent application.
- Grant of patent / Notice of allowance: Once the examiner is satisfied with the responses and the application meets the patentability criteria, the USPTO grants a “Notice of Allowance.” This means that the patent is likely to be issued once the necessary fees are paid. Pay the required issue fees to the USPTO within the specified time to maintain the application’s status. After the issue fees are paid, the USPTO issues the patent document, officially granting the inventor exclusive rights to their invention. The patent will be published and added to the USPTO’s database.
- Maintenance Fees: Pay the required maintenance fees periodically to keep the patent in force. These fees are due at specific intervals throughout the life of the patent.

The link here is the fees structure mentioned at USPTO website.
Each step of the process is explained in detail on its dedicated page/article. the links for detailed pages are given below:
For detailed information on the cost required, read our detailed article on the cost for filing patent in US. however for simplicity of understanding below is a quick overview of approximate attorney costs for filing a patent in US.
Cost of getting a Patent in United States (US):
There are two elements for the cost of getting a patent/filing patent in US:
- The Government fees for Forms, requests, and renewals.
- The Attorney fees for patent professionals
Here is the short answer for the attorney fees required to file patent in US :
- Novelty Search ($250 to $ 400)
- Provisional patent application drafting ($400 to $600)
- Non-provisional Patent drafting (from $1000 to $1,500) and after 1 to 2 years official fees $364 (micro
entity) - Responding to office actions (from $600 to $800) based on the number of objections received and its complexity.
- Notice of allowance (grant of patent) professional fees $100 – Official fees $240 (micro
entity)
The Steps, Procedure, Timeline and Cost for Patent in US given in a table format :
Note: steps highlighted in Orange color are either optional step or depends on case to case and are not mandatory to happen
| Sr. | Stages for Patent (links for more details) | Professional fees | Government Fees | Time required |
| 1 | How to go from Idea to Invention disclosure? Do I need patent agent of attorney | – | – | – |
| 2 | Signing Non-Disclosure Agreement (NDA) | – | – | 10 minutes to sign |
| 3 | Patentability / Novelty Search (Optional step) | $250 to $400 | – | 5 days |
| 4 | Drafting Complete Patent Application | $1000 to $1500 | 10 – 12 days | |
| 5 | Filing patent application | $200 | $364 (micro entity) | 1 – 2 days |
| 6 | Publication of patent application | – | – | After 12 months |
| 7 | Examination of patent application / Faster prioratised Examination is (Optional ) First time filer prioratised examination Track one prioratised examination | $200 | – First time filer prioratised examination ($ 0 ) micro entity – Track one prioratised examination ($840) micro entity | upto 1 Year |
| 8 | Office Action and Response | $800 | – | – |
| 9 | Grant of patent / Notice of Allowance | $100 | $240 (micro entity) | Depends on pendency at USPTO |
you may also like to read our detailed article on How to save costs when working with an experienced patent attorney.
Next > Step 1: Idea to Invention Disclosure (inception of the invention)
